As our main goal with ERPAL Platform is to provide a flexible business application solution build with Drupal, there is a pretty good chance that you would want to customize products to fit your needs. Therefore we want show you how to create custom product- and line-item-types, and how you can make a connection between those.
For our example, let's say we have a t-shirt-shop and we want to setup a product-type that gives us the option to specify the color and size of the shirts that we are shipping.
1. Create a product-type
Let's dive right in and create a new product type for our t-shirts.

- Navigate to: Store » Products » Product types » Add product type
- /admin/commerce/products/types/add
- Insert a name for your product-type e.g. "T-Shirt"
- Click the "Save and add fields"-Button at very the end of the form
- Add two new text-fields named "Color" and "Size"
- it will be beneficial to adjust the field names to
field_shirt_colorandfield_shirt_size, to prevent any inconveniences in the future - you might as well use taxanomy-terms or any other field type instead of text-fields, but we'll take the easy path for now
- it will be beneficial to adjust the field names to
- And save it!
2. Add line-item-type
Next we will create a new line-item-type so that the new product will eventually appear on an order.
FYI: These fields will be displayed while adding an item to an order, so you might want to adjust the field-sizes to fit your liking.
- Go to: Store » Configuration » Line item types » Add a product line item type
- /admin/commerce/config/line-items/add-product-line-item-type
- Insert a fitting name, we'll again go with "T-Shirt", as the line-item should accompany our new product-type
- Add the existing fields
field_shirt_colorandfield_shirt_size(in our case same as with product-type) - Save that line-item-type!
3. Connect product-type with line-item-type
We got the new product- and line-item-type ready, now we have to connect them both.
- Navigate to Store » Configuration » Order Settings » Manage fields and edit the "line items" widget-type
- /admin/commerce/config/order/fields/commerce_line_items/widget-type
- The widget-type should be set to "Dynamic line item widget"
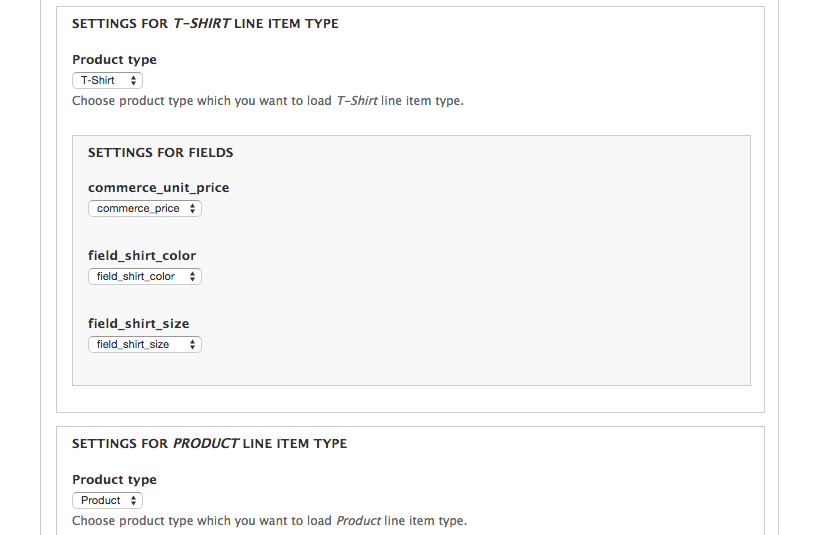
- Adjust the "Settings for T-Shirts line item type" (a fieldset within the dynamic line item widget fieldset)
- Select the correct "Product type", in our case - you might have guessed it - "T-Shirt"
- Set
commerce_unit_pricetocommerce_price - Set
field_shirt_colortofield_shirt_color - And finally
field_shirt_sizetofield_shirt_size
- Hit "Continue" and "Save"
You may want to repeat these steps for your invoices and quotes as well. Their config is located at: Store » Configuration » Order types » Invoice / Quote. /admin/commerce/config/order-types
4. Finally: create a product & test it
Now you should check if everything is working as expected.
- Go to "Products" in the ERPAL Menu and hit the local action (the button on top) "Add a product"
- /product/add/t-shirt
- alternatively go to Store » Products » Add a product » Create T-Shirt
- /admin/commerce/products/add/t-shirt or via the
- As you can see our two new fields are added to the form. Now insert all data. Remember the sku-value.
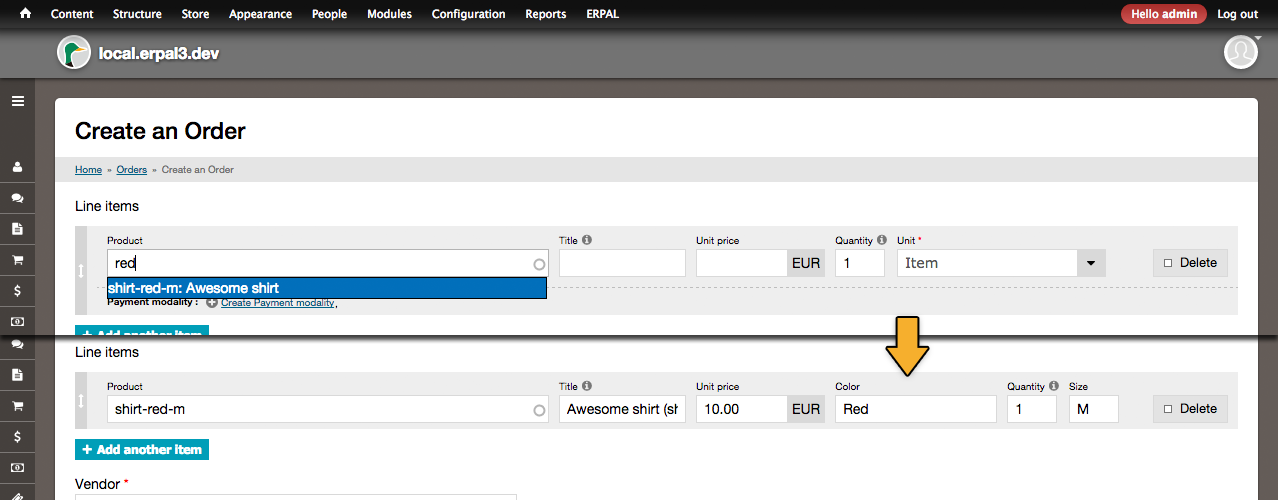
- When creating an order insert the sku into the product-autocomplete-field and select the recently created product
- /order/add
- Now you should see that the fields adjusted to the corresponding line-item-type and the values of the product's fields are copied.
Summary
So what have we learned today? Adding a custom product-type is not much more complicated than adding a new content-type to a Drupal-site. It is important to create not just the product-type but also a line-item-type and connect them. All in all just 3 small steps.